


Bulk Network Cable
1000 Ft Boxes - Bulk Cat 5E & Bulk Cat 6 Available In 8 Colors
0.0 / 5
Network Cable Bulk Cat5E & Bulk Cat6 Cable Features
- SOLD IN BOXES CONTAINING 1000 ft LENGTH
- Square: 24AWG
- Cat5E 350 Mhz
- Cat6 550 Mhz
- PVC Jacket
- 8 Conductor/4 Pair
- Solid Copper Conductor
- UTP (Unshielded Twisted Pair)
- Sequential Foot Markers
- Verified Compliant with EIA/TIA
Available in 1,000-foot bulk box, the high-density polyethylene-insulated cable is perfect for Network, Voice, and Multimedia. Featuring four-pair unshielded twisted pair cable and 24AWG solid bare copper conductors, the cable is foot marked and housed in an EZ pull box.
Are we missing the specification you need? Please go to our Contact Us page and submit your question to us, or call 1-877-284-7760
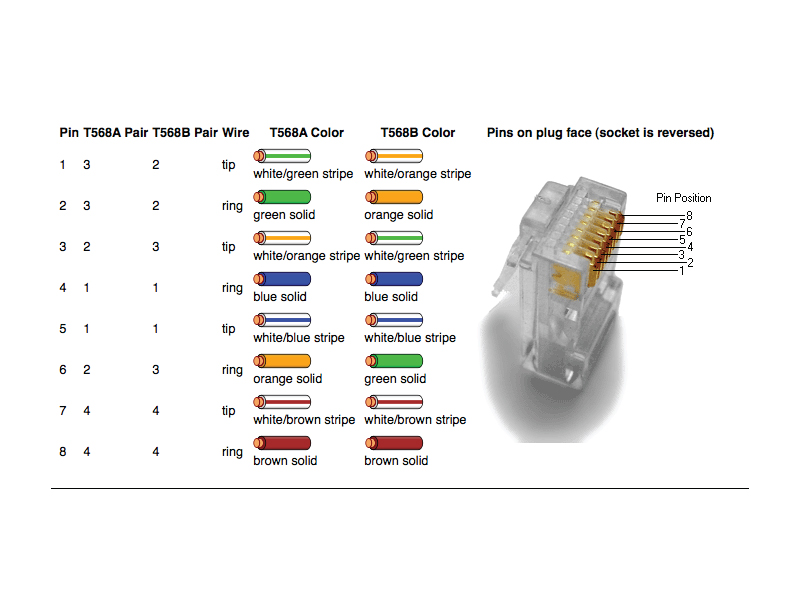
RJ45 Pin Out
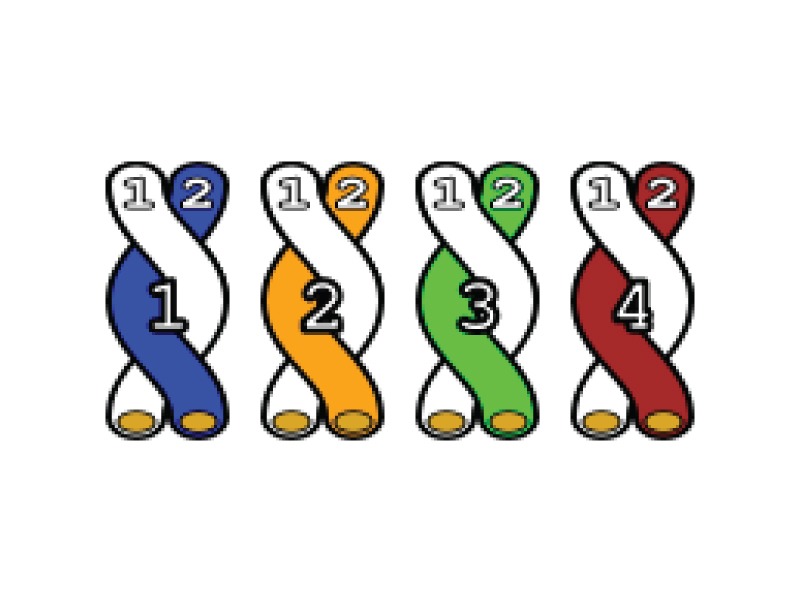
Colour Code
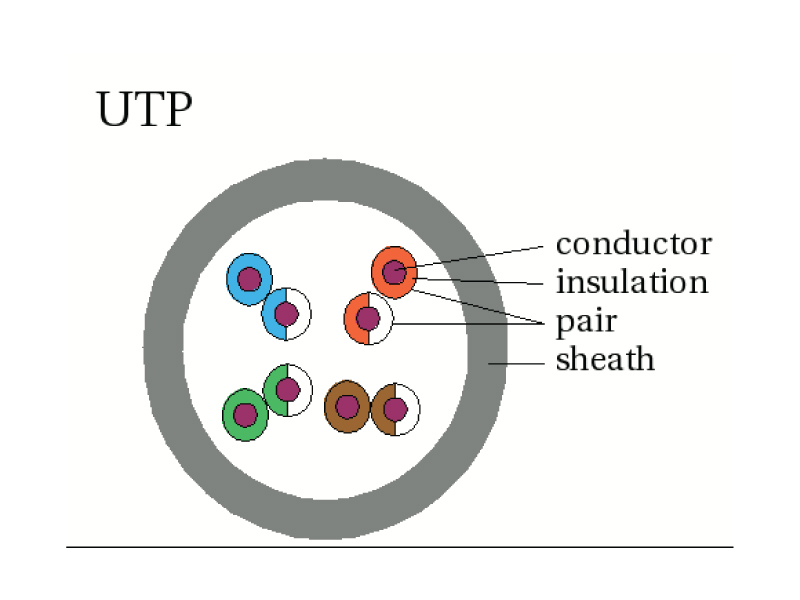
UDP Cable Structure
We have a 30-day return policy, which means you have 30 days after receiving your item to request a return.
To be eligible for a return, your item must be in the same condition that you received it, and in its original packaging. You’ll also need the receipt or proof of purchase.
To start a return, you can fill out the ORDER RETURN FORM HERE. If your return is accepted, we’ll send you the instructions on how and where to send your package. Items sent back to us without first requesting a return will not be accepted.
DEFECTIVE, DAMAGED, OR INCORRECT ITEMS SHIPPED
If you have received a defective, damaged, or incorrect product, do not worry! Please contact us by phone or the Contact Us Form within five (5) days of receiving the product, along with the invoice or packing slip, to schedule a return. We will replace these products at no additional cost. Please keep in mind that we may require photos for documentation and to authorize call tags for returns.
Because we put our customers’ experience first, any defective, damaged, or incorrectly shipped products by CTAM, or by our manufacturers, will be re-shipped at our expense. We will also provide you with a return shipping label with detailed shipping instructions.
Please note that if the item is damaged as a result of the customer’s actions, then a return will not be approved, and the damaged items will be discarded. If the customer wants to keep the damaged items, they must first cover the shipping fees, after which the company will return the damaged items. After the five (5) day time has expired, CTAM will not be responsible for any defective, damaged, or incorrect items, regardless of who is at fault.
Exceptions / non-returnable items
Certain types of items cannot be returned, like custom products (such as special orders or personalized items). Please get in touch if you have questions or concerns about your specific item. Certain Items will Carry restocking fees for us to take back into our stock, This is due to items being made to order or for being an oversized item.
Exchanges
The fastest way to ensure you get what you want is to return the item you have, and once the return is accepted, make a separate purchase for the new item.
Refunds
We will notify you once we’ve received and inspected your return, and let you know if the refund was approved or not. If approved, you’ll be automatically refunded on your original payment method. Please remember it can take some time for your bank or credit card company to process and post the refund too.
Have a question that is not answered here? Please go to our Contact Us page and submit your question to us.
Looking for a quotation ? We would be happy to help by providing a quick response, inventory status, and Volume Level pricing, when available. Please fill out the form below and a representative will be in touch with you within hours to one business day to answer any questions and quote your request.
Product Details
Available in 1,000-foot bulk box, the high-density polyethylene-insulated cable is perfect for Network, Voice, and Multimedia. Featuring four-pair unshielded twisted pair cable and 24AWG solid bare copper conductors, the cable is foot marked and housed in an EZ pull box.
Product Specifications
Are we missing the specification you need? Please go to our Contact Us page and submit your question to us, or call 1-877-284-7760
RJ45 Pin Out
Colour Code
UDP Cable Structure
Product Manuals
Frequently Asked Questions
Have a question that is not answered here? Please go to our Contact Us page and submit your question to us.
Videos
We have a 30-day return policy, which means you have 30 days after receiving your item to request a return.
To be eligible for a return, your item must be in the same condition that you received it, and in its original packaging. You’ll also need the receipt or proof of purchase.
To start a return, you can fill out the ORDER RETURN FORM HERE. If your return is accepted, we’ll send you the instructions on how and where to send your package. Items sent back to us without first requesting a return will not be accepted.
DEFECTIVE, DAMAGED, OR INCORRECT ITEMS SHIPPED
If you have received a defective, damaged, or incorrect product, do not worry! Please contact us by phone or the Contact Us Form within five (5) days of receiving the product, along with the invoice or packing slip, to schedule a return. We will replace these products at no additional cost. Please keep in mind that we may require photos for documentation and to authorize call tags for returns.
Because we put our customers’ experience first, any defective, damaged, or incorrectly shipped products by CTAM, or by our manufacturers, will be re-shipped at our expense. We will also provide you with a return shipping label with detailed shipping instructions.
Please note that if the item is damaged as a result of the customer’s actions, then a return will not be approved, and the damaged items will be discarded. If the customer wants to keep the damaged items, they must first cover the shipping fees, after which the company will return the damaged items. After the five (5) day time has expired, CTAM will not be responsible for any defective, damaged, or incorrect items, regardless of who is at fault.
Exceptions / non-returnable items
Certain types of items cannot be returned, like custom products (such as special orders or personalized items). Please get in touch if you have questions or concerns about your specific item. Certain Items will Carry restocking fees for us to take back into our stock, This is due to items being made to order or for being an oversized item.
Exchanges
The fastest way to ensure you get what you want is to return the item you have, and once the return is accepted, make a separate purchase for the new item.
Refunds
We will notify you once we’ve received and inspected your return, and let you know if the refund was approved or not. If approved, you’ll be automatically refunded on your original payment method. Please remember it can take some time for your bank or credit card company to process and post the refund too.
Related Items


| PART # | |
|---|---|
|
|